This post may contain affiliate links. Please see our disclosure policy.
Elderberry pie is a delicious and easy elderberry recipe that works with either fresh or dried elderberries. It doesn’t take much, just a few cups of elderberries and you’re well on your way to a delicious old fashioned elderberry pie.

Every year we try to get a bit more creative with the elderberry harvest. Of course, every year we make our old standbys: elderberry syrup for the kids, an elderberry oxymel for winter colds and an elderberry tincture for immune support in the deep winter months.
I still have a few jars of scrumptious elderberry jelly left over from last year, and we’re still slowly working through a 5 gallon batch of elderberry mead (honey wine) from a few years back. With all the elderberry love we still have in the larder, this year I decided to test out an elderberry recipe that just won’t keep: Elderberry Pie!

Pie is always popular in our house, and it’s rare that a homemade pie makes it 24 hours. It’s a good way to use up elderberries when you’ve already got plenty preserved for winter.
I’ll be honest, I was a bit skeptical of elderberry pie for two reasons. First, elderberries are heavy on juice and light on pectin. I assumed that the berries would pop and make elderberry soup in a crust. Second, they have tiny seeds inside and I imagined that those would be pretty annoying in quantity. Luckily, I proved myself wrong on both counts!
Elderberry pie thickened up nicely without a fuss, and it actually came out in a clean slice with no puddling.

The seeds weren’t really a problem either. Sure, you can tell they’re there, but the cooking process actually softens them considerably and you’d barely notice the difference between an elderberry pie and a blueberry pie in terms of texture.
Truth be told, the finished elderberry pie was actually smoother than most berry pies, such as blackberry or raspberry.
How to Make an Elderberry Pie
The first step to making an elderberry pie is actually the hardest: finding fresh elderberries. It can be tricky to find fresh elderberries unless you grow them yourself, and even then, it’s hard to beat the birds to the harvest.
I did successfully make elderberry pie with dried elderberries, and I’ll discuss that technique a bit later. For now, let’s stick with fresh.
Start by stemming the elderberries. I just did it quickly by hand with the fresh-picked berries and it only took about 5 minutes. Not much different than the amount of time it takes to peel apples for apple pie.
Most people suggest stemming the berries by freezing them first, which is likely a bit cleaner in terms of mess on your hands. Frozen elderberries pop right off the stems, and they’re just fine for elderberry pie.
Remove every bit of stem and leaf, and pick out any green or unripe berries. Use only ripe blue or black elderberries, never red elderberries. If you’re foraging, here’s how to tell wild elderberries apart.

Elderberry Pie Filling
Generally, when I make berry pies or pies of any sort, I use raw fruit and just toss the fruit with a bit of sugar, thickener and sweetener before loading it into the pie crust. I consulted a lot of recipes for elderberry pie, and though they varied a good bit, the one thing they all had in common was cooking the filling before putting it into the crust.
That’s probably what creates such a smooth filling that sets up well once it’s cooled. Everything gets heated and mixed before it goes in, and the thickener dissolves directly into the fruit juice so that it doesn’t make a soggy crust.
This recipe has a good bit of sugar, way more than I use in most of my pies, but elderberries really need the extra sweetness. I added the juice of 1 lemon (about 2 tbsp) to help balance it a bit, and bring out the flavor of the elderberries.
Start by dissolving the sugar and cornstarch in a bit of water (about 1/2 cup). You can use elderberry juice or tea made from dried elderberries for more flavor too. Bring it to a hard boil and then add the lemon juice and fresh elderberries. Allow the mixture to cook until heated through, about 2 to 3 minutes. Then remove from heat and let the filling cool completely before it goes into the crust. Warm filling softens the dough, which makes a lattice top hard to weave.
Elderberries always need to be cooked before eating. This short simmer thickens the filling, and the full bake, until the filling bubbles, cooks the berries through.

Assembling an Elderberry Pie
Feel free to use any pie crust recipe, but I’ve included instructions for my go-to pastry crust. It’s really simple, just flour, butter, a pinch of salt and a few tablespoons of water.
Split the pie dough in half and roll out one side to line a pie plate. I’m using a cast iron pie pan because the thick cast iron really crisps the bottom crust and prevents it from getting soggy. It works well for custard pies like pumpkin pie, or wet berry pies like this elderberry pie.
While you can go with a solid top crust, I opted for a lattice crust to show off the elderberries and allow extra steam to escape. My thought was that it’d help the elderberry filling set up because I was still worried about a runny filling. It turned out not to be necessary, the filling set up wonderfully, but it did make for a beautiful pie.
Just brush the top with a bit of milk or egg white to help it brown nicely, and your pie is ready for the oven.

Elderberry Hand Pies
As part of this whole elderberry pie-making adventure, I promised to make a few elderberry turnovers for my friend Susannah’s elderberry cookbook. The thing is, I’m horrible at shaping turnovers, and I cheated a bit instead.
We used to sell mini pies at local farmers markets and we made a killing baking them in bulk in small tart pans. I stole a bit of the pie filling and made a tiny elderberry tart instead.

Elderberry Pie with Dried Elderberries
Though I had fresh elderberries, this project wouldn’t be complete without at least trying to make pie with dried elderberries. I assumed they’d be a bit crunchy and that the fruit wouldn’t be quite the same. They actually came out really good, and I was the only one that could tell the difference between the mini pies made with fresh fruit as opposed to dried.
I only made a few tarts, so I’m not entirely sure on the measurements for a full pie. I started by taking 1 part dried elderberries and covering it with 2 parts water. I let that soak overnight before adding both the soaked fruit and soaking liquid to a pot with sugar, thickener, and lemon juice. I’d guess for a whole pie you’d need 2 to 2 1/2 cups dried elderberries, soaked in 4 to 5 cups water.
Simply substitute the soaked fruit and liquid for the fresh berries in my fresh elderberry pie recipe. My 4-year-old taste tester loved the results…

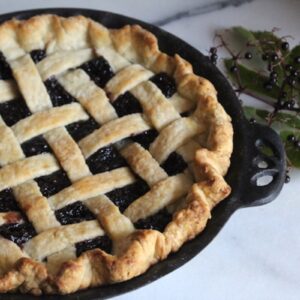
Elderberry Pie
Equipment
Ingredients
Crust
- 2 1/4 cups all-purpose flour
- 1 cup butter, cold, cubed
- 1/2 tsp salt
- 1 tbsp sugar, optional
- 4 to 6 tbsp water, ice cold
Elderberry Pie Filling
- 4 cups elderberries, ripe, stems removed, fresh or frozen
- 1 cup sugar
- 3 to 4 tbsp cornstarch, or tapioca starch
- 2 tbsp lemon juice, about 1 lemon
- 1/2 cup water, or elderberry juice, see note
Topping (optional)
- 1 tbsp milk or egg white, for brushing
- 1 tbsp sugar, for sprinkling
Instructions
- Prepare the pie crust by mixing the flour, salt and sugar (if using), then cutting the cold butter into the flour mixture until crumbly. Add the ice water a little at a time and bring the dough together into a cohesive mass. Divide it into two pieces, wrap and refrigerate.
- Clean and stem the elderberries, removing every bit of stem and any green or unripe berries. Use only ripe blue or black elderberries, never red elderberries.
- Place the sugar, cornstarch and water in a saucepan large enough to hold all the filling. Bring the mixture to a boil, stirring to dissolve.
- Add the elderberries and lemon juice and cook another 2 to 3 minutes, until heated through. Set aside to cool completely while you prepare the crust.
- Remove one half of the crust from the refrigerator, roll it out and use it to line a 9-inch pie pan.
- Fill the crust with the cooled elderberry pie filling, and then top with the second half of the crust, as a lattice top or a solid top. Cut a few slits in a solid top to let steam escape.
- Seal the edges, and optionally, paint the top with milk or egg white for a golden crust. A sprinkle of sugar on top is also a nice decorative touch.
- Bake at 425°F for 30 minutes, then reduce the oven temperature to 350°F and bake another 20 to 30 minutes, until the crust is browned and the filling is bubbling.
- Let the pie cool completely, about 3 hours, so the filling sets before you cut it.
Notes
More Elderberry Recipes
Looking for more delicious elderberry recipes? Here are a few to get you started:
- Homemade Elderberry Gummies
- Old-Fashioned Elderberry Jam
- Elderberry Wine
- Elderberry Lollipops
- 100+ Elderberry Recipes

I made this today for a pie breakfast, so I’ll admit I haven’t tasted it yet. Recipe was easy and the filling tasted good. One thing I’ll note – if you want to do the lattice top crust, wait for the filling to cool completely. Otherwise the lattice starts to melt and is hard to weave over and under.
Great tip, thanks for sharing! You’re right, warm filling softens the lattice strips and makes weaving a lot harder. I should be more explicit about letting it cool completely in the instructions. Hope everyone enjoys the pie breakfast!
The recipe turned out amazing! I made mini pies instead of a full-sized one and used fresh elderberries—thank you so much!
We recently discovered an elderberry bush on our property and had no idea it was there. I was excited to discover this bush and searched for pie recipes on Pinterest and found yours. We made our first elderberry pie tonight and loved it! Your tip to freeze the berries was very helpful too. Thank you so much. This is going to be a “keeper” recipe.
Raw elderberries contain a form of cyanide, and should be thoroughly cooked 20-30 minutes to remove the toxins. I’m very surprised that the recipe only allows for 2-3 minutes cooking.
Elderberries do need to be cooked, but there’s no need to simmer them for 20 to 30 minutes. University of Minnesota Extension says the moisture and heat of baking destroy the toxins in baked goods, and this pie bakes for 50 to 60 minutes until the filling is bubbling. The bigger thing, per both Minnesota and Oregon State Extension, is removing all the stems, leaves and unripe berries, since the stems and leaves carry more of the toxins.